Using Subversion (SVN) In Eclipse
Have one member of your group complete this section on Setting Up An SVN Repository, then have the other members join in.
While the other members are waiting, they can click on and work on this Eclipse Debugging Exercise.
Setting Up An SVN Repository..
-
Begin by logging into GAUL. To give your team access to the directory structure, type the following commands at the Unix prompt:
cd home
chmod g+rx .
Make sure you include the period in the second command.
-
Next, we create the Subversion repository structure. Use the svnadmin command to do this from your home directory.
cd home
svnadmin create Repo

- Type the groups command in Unix to see which groups you are assigned to on Gaul. Write down the name of your group for cs2212 here: ______________. It should be something like: cs2212-102 (if you are in group 2)
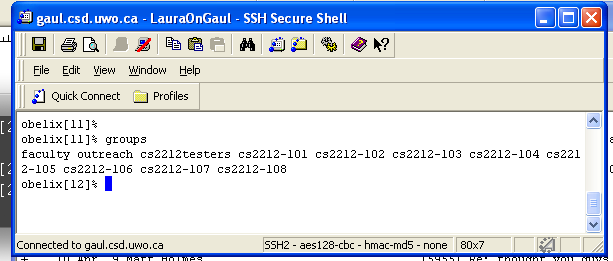
- Once created, we recursively change the default group for your repository folder.
chgrp -R cs2212-10(?) Repo

-
To finish up, we will need to recursively assign permissions for your team members to use the repository.
chmod -R g+rxs Repo

- cd to the directory called Repo. Now write down the absolute path where the repository, Repo, is located. To do this type the unix command pwd . The write down the path here: __
 __________________________________ (you will need it later). In the example below the path is /faculty/lreid/Repo
- NOTE: there has been an error happening with setup that will affect SVN and make it not work properly. cd to Repo/db directory and make sure that the file called: ../Repo/db/rep-cache.db has WRITE access for the group. (otherwise the commit might cause an error)
Connecting to the SVN Repository on GAUL from within Eclipse..
-
Launch your Eclipse 3.5 Galileo or newer.

-
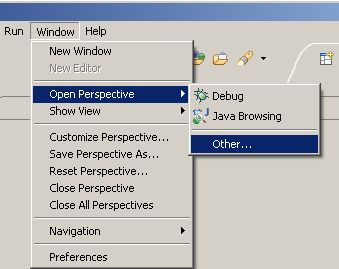
Next, you will need to select the SVN perspective, by clicking the Window menu, then the Open Perspective submenu and then choosing Other..
-
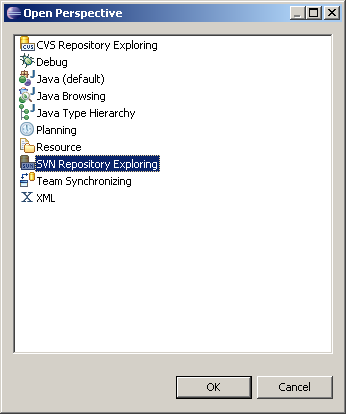
You should be able to select SVN Repository Exploring from the next window. If not, you will need to Set Up SVN In Eclipse.
-
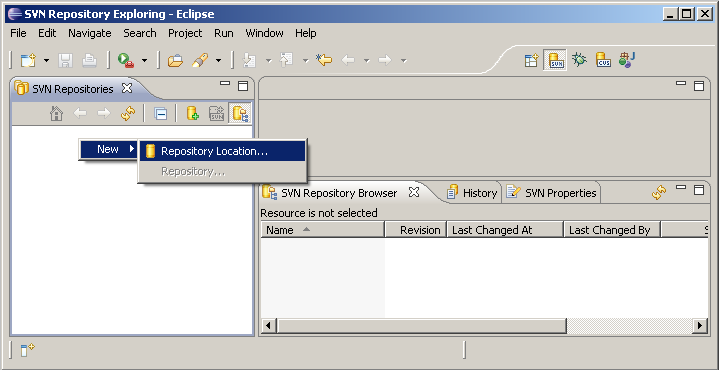
Once your SVN Repository Exploring perspective is open, we begin by defining a new repository location. Right-click in the SVN Repositories window and select New->Repository Location...
-
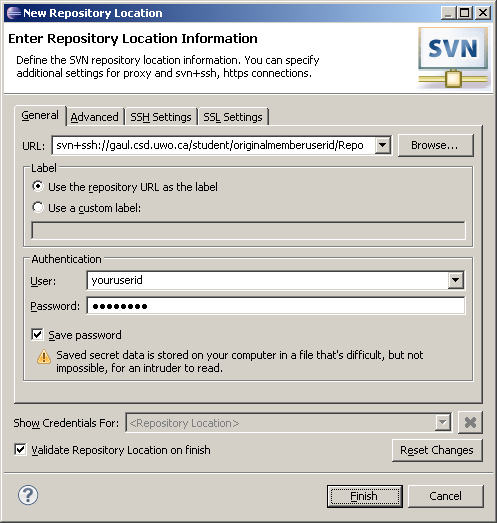
To configure a new repository location, enter a URL like one the following:
(use the path name you wrote above in the Setting up the Repository section, step 6)
svn+ssh://gaul.csd.uwo.ca/student/[userid-who-created-the-repository]/Repo
svn+ssh://obelix.gaul.csd.uwo.ca/student/[userid-who-created-the-repository]/Repo
You will also need to enter your own user account and password for authentication. When you're all done, click Finish.
-
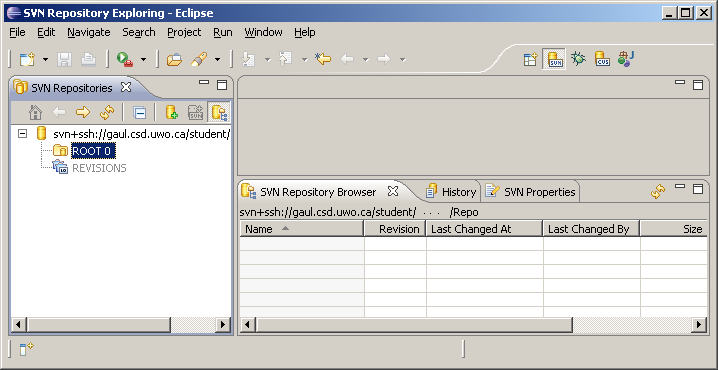
If this works successfully, you should see a new repository location that looks like this:
- If you are the first member setting the repository up, continue on to the next step: Sharing a New Java Project..
If you are the other members who just joined in, then jump back down to Programming with SVN and carry on with step 2.
Sharing a New Java Project..
-
Switch back to the Java perspective by opening the Window menu and selecting Java from the Open Perspective submenu.
You may need to select it from the Other... window if this is a fresh installation of Eclipse.
-
Start by creating a new Java Project. File->New->Other>Java Project. When asked what to call it, choose GroupSVNTest.
-
Go to the website http://www.csd.uwo.ca/~lreid/cs2212/code and download NewSimple3.java and Group.java. Add these java classes into this new project. Run NewSimple3 to make sure it works (click on Button 2 and a name should appear on the button).
-
Save both files.
-
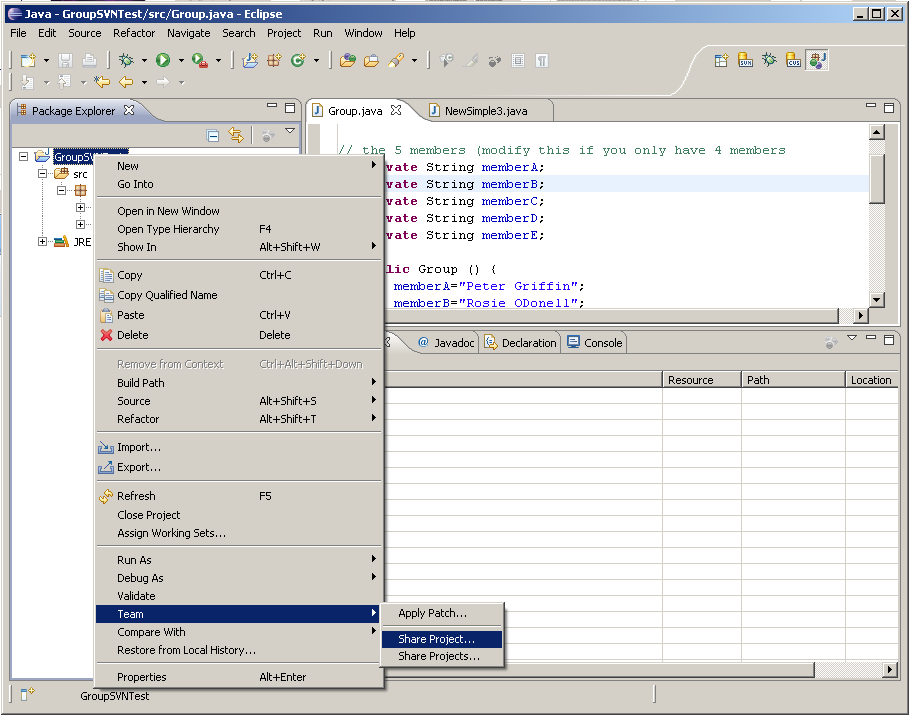
You can easily right-click on your project and choose Team->Share Project... as you see below.
-
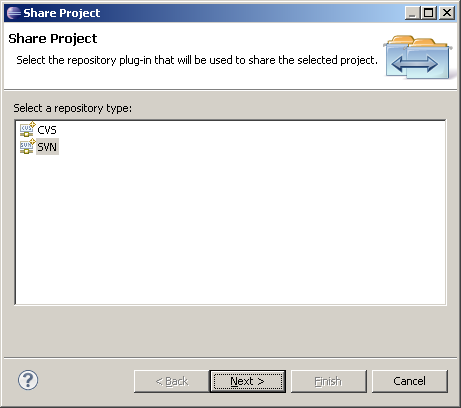
When asked how to share your project, select SVN and click Next.
-
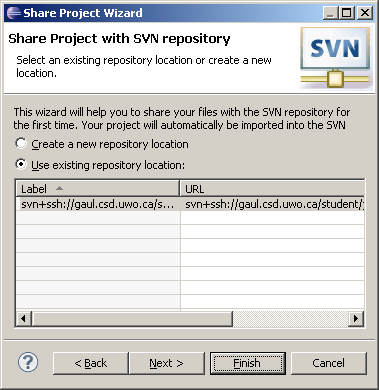
Click to use your existing SVN repository on GAUL, and click Finish.
-
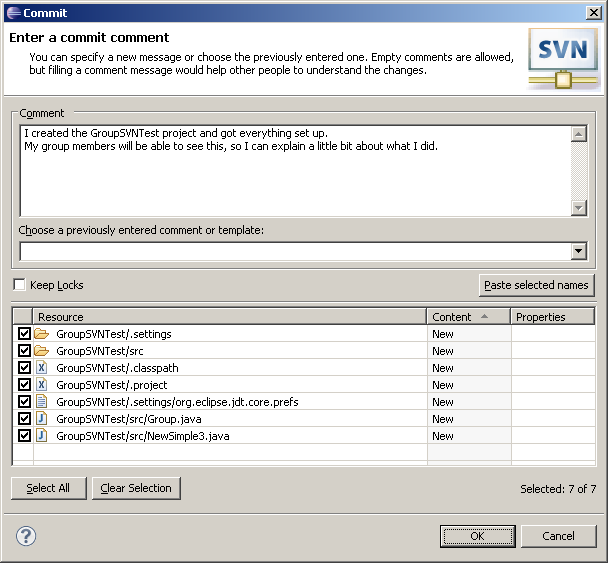
Next you will be prompted to make your first Commit to the repository. In this window you will select which files you want to upload, and enter a comment for your team members to see. These comments are important because in Subversion you can browse through all the history of your entire project, and switch back to any version of any file ever committed with the click of your mouse. When you're done, click OK to upload everything.
-
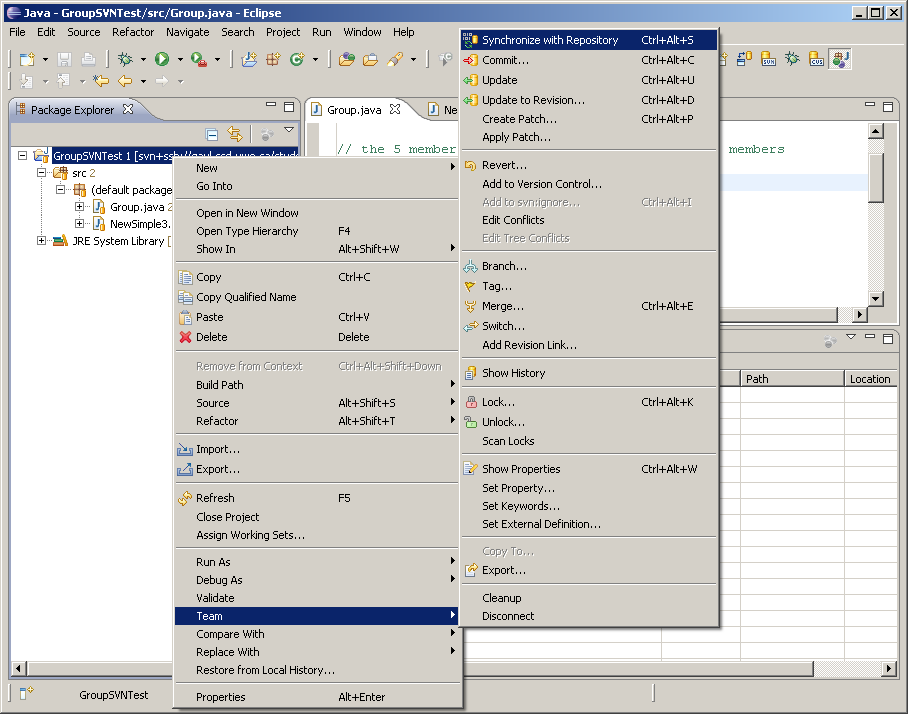
Finally, select Synchronize With Repository from the Team menu for this project.
-
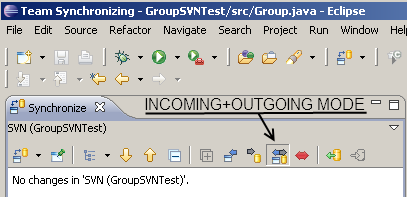
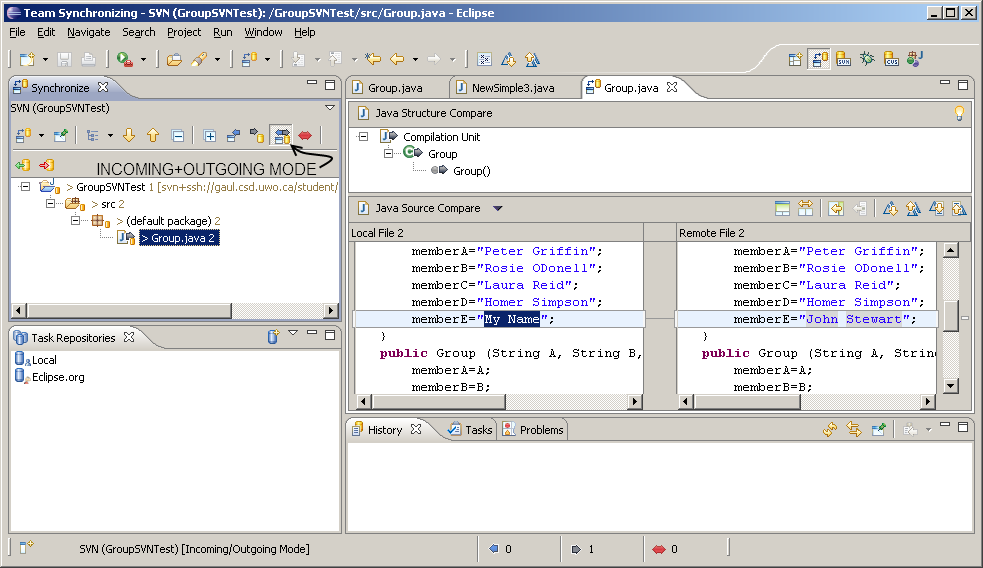
This brings us to the Team Synchronizing perspective. Make sure we have Incoming/Outgoing mode selected as indicated below. If you completed the commit, you will see that there are No changes in 'SVN (GroupSVNTest)'.
-
Go back to the Java Perspective (as we did before), and open Group.java. Notice in the constructor, that each member variable is given a name. Change MemberA's name from Peter Griffin to your real name and save the file.
-
Again, bring up the Synchronize With Repository from the Team menu for this project.
-
While in the Synchronize view open the Group.java file (click on the + next to GroupSVNTest and then the + next to src and the + next to default package) and then you should double-click on Group.java and see what your line originally looked like (and still looks like on Gaul in the Repo directory because the changes have not been committed yet (the Remote File) versus the new file with the changes you just made (the Local File).
-
Finally, right click on Group.java and select Commit from the Team menu to upload the changes to your name to the repository on Gaul.
(If you are right clicking on Group.java in the Project Explorer window, the menus will be Team>Commit, if you are right clicking on the Group.java in the SVN window then the menus will be Commit). Put a comment like "My first svn commit"
Now the changes made above will be on Gaul in the Repo folder. This is where the master versions of all classes and files are kept.
Programming With SVN.. HAVE YOUR OTHER TEAM MEMBERS JOIN IN AT THIS POINT!
-
Once your team member has created the repository on Gaul, follow the instructions above to get started Connecting to the SVN Repository on GAUL from within Eclipse NOTE: if other team members are having a problem committing and getting the message: attempt to write a readonly database , then you need make sure that the file: "/Repo/db/rep-cache.db" (which will be in the Repo database of the person who set up the database) has the write permissions set for the group (as well as read and execute). see here for more details
-
Expand the repository until you see the GroupSVNTest project created by your team member in the Sharing a New Java Project section.
-
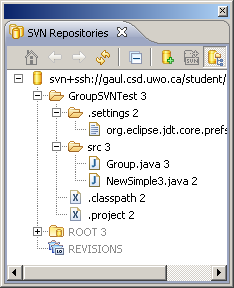
You should be able to expand the nodes of the project until you see the .java files created by your team member. The numbers next to each file are a sequence number for uploads to the repository called Commits. In the image below, Group.java was committed most recently, since it has a revision number of 3.
-
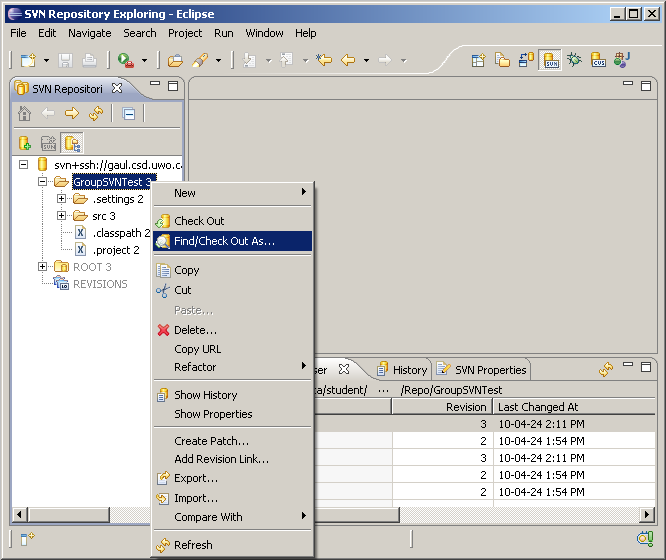
Right-click on your team's GroupSVNTest project and select Find/Check Out As... in the future, you can also choose Check Out, which is faster.
-
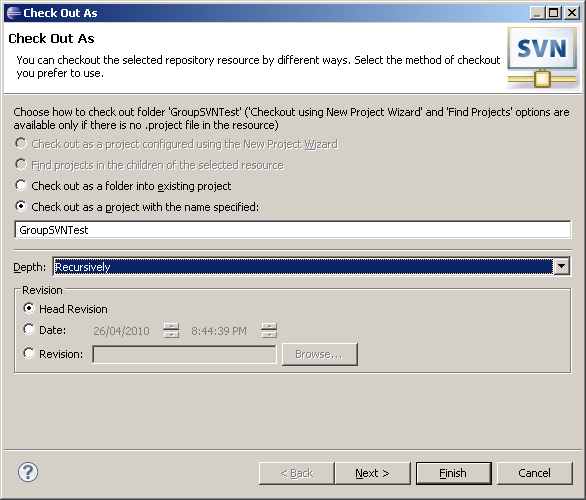
Although you will go ahead and click Finish here, notice that there are also options to specify a particular revision of your repository. You can even ask to check out your project as it looked on a particular date.
-
Next, we're going to switch back to the Java Perspective by selecting Window->Open Perspective->Other... Later you can also do this by clicking this same icon in the upper-right of your Eclipse window.
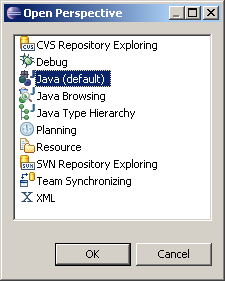
-
Each new member, should open Group.java and change the constructor so that it assigns their own name to memberA instead. For example, if it says memberA="Doug Vancise" and I am Mike Bauer, I would change this to say memberA="Mike Bauer". Save Group.java, and notice that the file has an indicator next to its name to let you know it has been changed but not uploaded, yet.
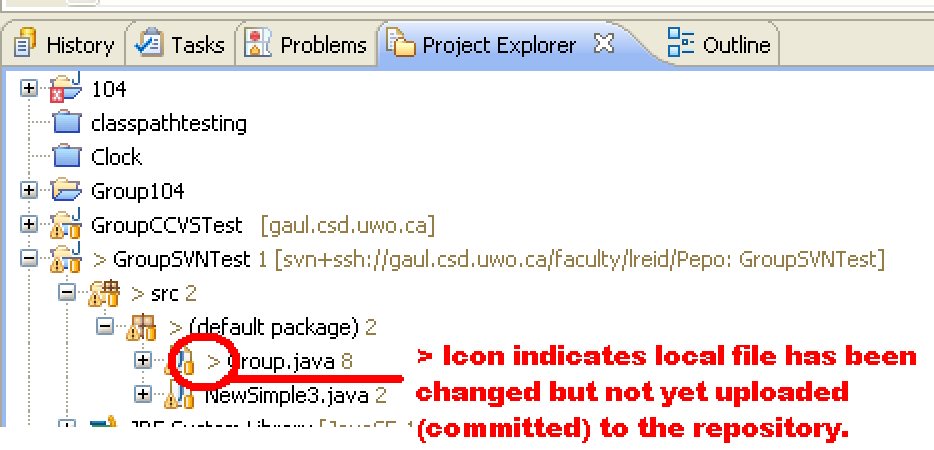
-
Run the program again and click on Button 2 to make sure the change worked.
-
To review your changes, right click on GroupSVNTest or Group.java and select Team->Synchronize with Repository

-
This brings us to the Team Synchronizing perspective.
Make sure you have Incoming/Outgoing mode selected as indicated below.
Then browse down (expand GroupSVNTest3) to Group.java and double click on the file Group.java.
You can see what your line originally looked like (and still looks like on Gaul in the Repo directory because the changes have not been committed yet (the Remote File) versus the new file with the changes you just made (the Local File).

-
To upload your file, right click on it and choose Team->Commit. In this window you will select which files you want to upload, and enter a comment for your team members to see. These comments are important because in Subversion you can browse through all the history of your entire project, and switch back to any version of any file ever committed with the click of your mouse. When you're done, click OK to upload everything.
Note: Whoever got to commit first, his/her changes will take place and the remaining members should get an Error.
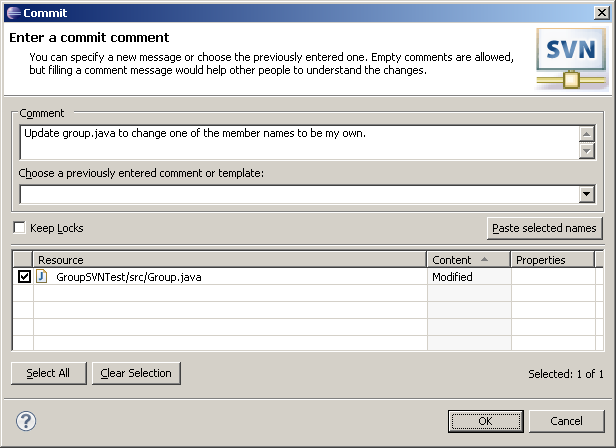
-
Team members who receive an error should right-click on Group.java and select Team->Update.(Right click on Group.java in the Project Explorer Window, not in the Synchronize Window)) Here you will see the changes made by the first member to successfully commit.
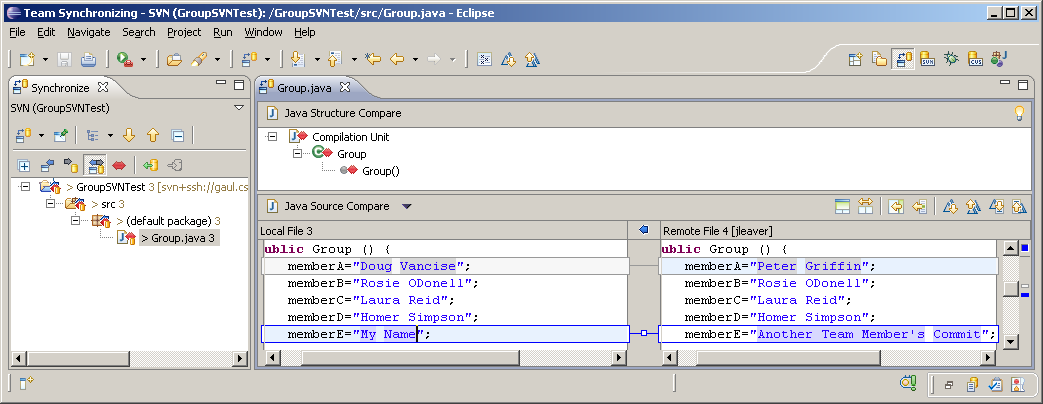
-
When a conflict like this has been encountered, you, (the person who received the error when committing) have two good choices. You can:
-
Override and Update which aborts your own changes and keeps in the other person's copy, or
-
Merge these changes and Commit again -
to do this, you can use the other buttons in the Comparison View window to copy lines back and forth between the Local and Remote copies. Once you are confident that your Local Copy has the changes you want to keep, right-click on the conflicted local file in the Comparison Window and select Mark as Merged.
At this point, you can try your Commit again.
Fortunately, most of the time you will not be working on the same classes, so this will be rare. Also, it's a very good idea to compile and re-test your project before you commit. In some companies, the software engineer who commits broken code buys lunch!
-
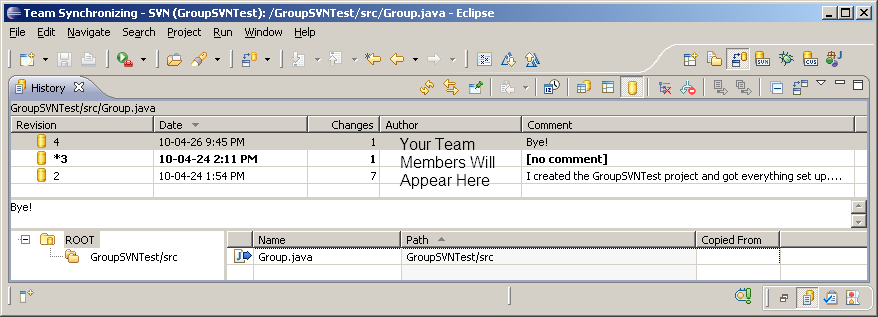
If you are suspicious of some changes that have been made and want to learn more about what your team members were thinking, you can right click on any file or folder to Show History. As you can see from the example below, good comments make it much easier on your team members! Missing or poor comments will make more work for them and, remember, they get to submit Peer Evaluations. NOTE: If you double click on one of the lines in the revision history you will see what the code looked like at that point in the history of the code.
-
You can add other files to the repository in addition to .java files. For example, you could add your class diagrams and use case diagrams to the repository.
It is a good idea to add all your data for the assignments such as your class diagrams (Visio files) and your Gantt charts to your group's repository.
Have a member add the following four files to the repository where the other members can check them out and work with them.
The files are: SampleClassDiagram.pdf, SampleClassDiagram.vsd, SampleUseCaseDiagram.pdf and SampleUseCaseDiagram.vsd.
Add these files as follows:
- On your desktop, create a folder called DocumentationFiles.
- Copy the 4 files above (the 2 .vsd files and the 2 .pdf files) into this folder.
- In Eclipse go to Window>Open Perspective> Other...>Java., (make sure you are in the Java Perspective). Then right click on your GroupSVNTest project and select Import. Then select General->File System->Next
- In the From Directory field, browse to the DocumentationFiles folder on your Desktop.
- Check to include all 4 files and select Finish.
- Note: We haven't uploaded them yet. Right click on your project again and select Team->Commit. Include a meaningful comment, such as "Added documentation visio files for the SVN workshop." and choose Finish.
- Your other team members can now right-click on their projects to select Team->Update or Team->Synchronize to download the new files.
You will probably want to do this with ALL your group assignment files for cs2212.
Ready for the Real World..
-
To create your real project repository, try these steps again to set up a fresh repository called cs2212project in one group member's account as we did with Repo in this Workshop.
-
One Final Thought: Employers like to see that computer science students have had experience with professional code repositories. Make sure to include that you have used Subversion (SVN) on your resume! :-)
Using the Debugger in Eclipse
- Go into eclipse and start a new java project (From main menu select -->
File, New, Project, call the project DebuggingTests)
- Create a new class called MyMain (from main menu select --> File, New,
Class)
- Go to this website: http://www.csd.uwo.ca/~lreid/cs2212/debugger/MyMain.java and paste
the code into MyMain
- Create a new class called AnotherClass
- Go to this website: http://www.csd.uwo.ca/~lreid/cs2212/debugger/AnotherClass.java
and paste the code into AnotherClass
- Save and run (right click on MyMain.java in the Package Explorer Window,
then select Run As, then select either Run OR Java Application) the program MyMain once, just to see what it does (look at
the code, it is fairly simple)
- Change from the Java Perspective to the Debug Perspective (Window, Show
Perspective, Other, Debug)
- Set a breakpoint on the line--> y = junk(100); (the fifth line in the main
method). The way you set a breakpoint is you double click on the area in the
left, before you set the breakpoint you will see:

after you set the breakpoint you will see:

- Run the program as normal with the Run option (you should see no change)
- Now run the program using the Debug Run (click on this:
 ,the icon looks like a
little bug) The program will now stop at the breakpoint line. Hover your mouse
over the variable x in the line above--> x=junk(50); you should be able to tell what value is in the
variable x right now.
- Click on the Step Over button on the debug tool bar and watch what happens
 .
Click on it again and hove over the variable x as you do it each time. Watch
the x change values. Continue clicking on the Step Over button till you reach
the second System.out.println, then click on the Resume button:
 The Resume button will continue the program on till the end of the program (or
a prompt or the next breakpoint)
- Run the program again in debug mode, this time, when you hit the
breakpoint, use the Step Into button (not the Step Over button) Keep clicking
on the Step Into button and notice the difference between it and the Step Over button
- Now put a breakpoint somewhere in the constructor of AnotherClass
and watch what happens when you run in debug mode. Watch what happens when you
click Resume (it should stop at your next breakpoint). Also notice in the
debug window, you can tell which class and which method you are in. Now Terminate/stop (the red square) the program

- Put a breakpoint on the line--> x=17; Run the program again in debug
mode, when you get to the breakpoint, right click in the Variables window and
add a watch by clicking on the Watch option. The Expressions window will show
up, right click and select Add Watch Expression, type z in the box that
appears, then add another watch for y. Then click on the Step Into button until
you get to the line--> x=x+10; Double click on the + next to the z in the Expressions window. See if you can change the value of the z.zz variable while
it is still running (hint: right click on the zz variable in the expressions
window).
- There are lots of other things the eclipse debugger will let you do, but
this should at least get you started!
Back to where the other members join in on the subversion workshop
Back to Top


 __________________________________ (you will need it later). In the example below the path is /faculty/lreid/Repo


 .
Click on it again and hove over the variable x as you do it each time. Watch
the x change values. Continue clicking on the Step Over button till you reach
the second System.out.println, then click on the Resume button:
 The Resume button will continue the program on till the end of the program (or
a prompt or the next breakpoint)